PDF Designer
Getting Started
How to use this guide
In order to change the design of a PDF document, you need to go through two steps.
- Analyze and define the different parts of the original text that comes from your ERP system (Left view – Original Input View).
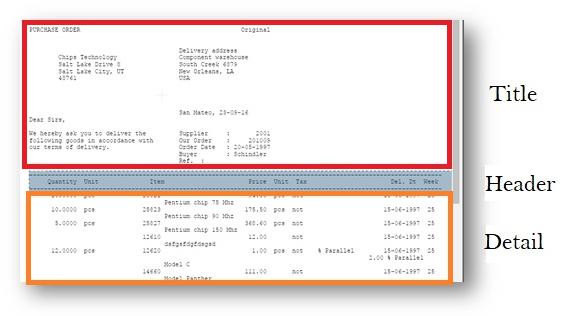
The main parts of every original text is the following:
In addition, you can define the following additional parts that can be identified in the whole document or in one of the main parts (title, header or detail).
These additional parts are the following:
- Fixed blocks
- Patterns
- Floating Headers
- Multi-line detail
- Once the parts are defined, you can apply different design changes on these parts using the right screen – Designer, which includes removing, moving, changing font and color and adding additional parts like graphics, text and barcode.
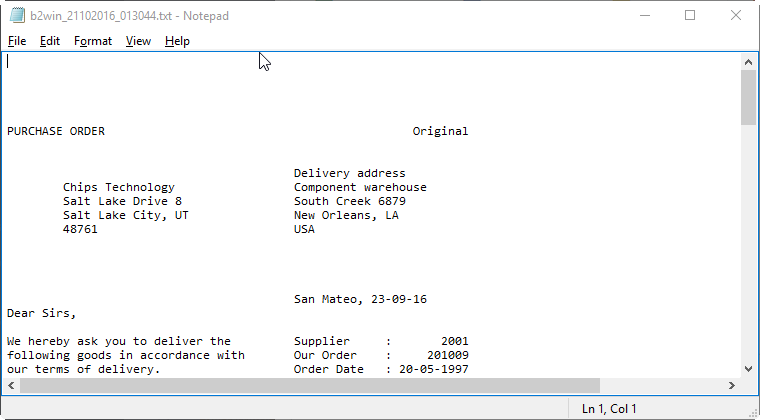
Original Input View
General
This chapter describes the way to mark all parts of the report in the Original Input view as blocks so you can keep or delete it from the final result, and design each block for the final pdf result, by assigning the right color, font type or size etc.
In case you have the PDF Designer opened with some previous settings and you need to start your design from scratch then you can click on the menu File -> New, and then all your settings will be removed and you can start a fresh new design.

First step in your design should be marking blocks which means to select the report parts.
Marking blocks is done simply by selecting the text in this view in the right position and then select the block type.
There are several types of blocks that will be described in detail in this chapter.
Block General Icons
All blocks have the following action icons, when a block is selected then these icons are enabled for this block. (icons appear in the toolbar and next to the block)
Settings
Open the settings window for the selected block.
![]()
Reposition
This option removes the current marking for the selected block and allows the user to mark it in a new position
Delete
Delete the marking of the selected block

Blocks List
All blocks are included in the blocks list located in the tool bar in this view, you can choose any block from the list and as a result it will be selected. This is helpful when you need to locate a block in order to change its settings or delete it or just to find its position in the report.
Block Display Name
You can choose the block name to be displayed in the blocks list in the “Display Name” field in the blocks setting window.
Title
Title is usually on every page and contains all lines from the start of the first page until the main header’s first line. In most cases, it’s recognized automatically and removed in tabular result.
Main Header
Introduction
Every report has a header that contains the column names which usually appears in every page.
If the main header is not detected automatically, or if it was mistakenly detected, you can manually select it and choose Main Header in the menu that you’ll get.

We will go over four types of headers in the following points.
Header Types
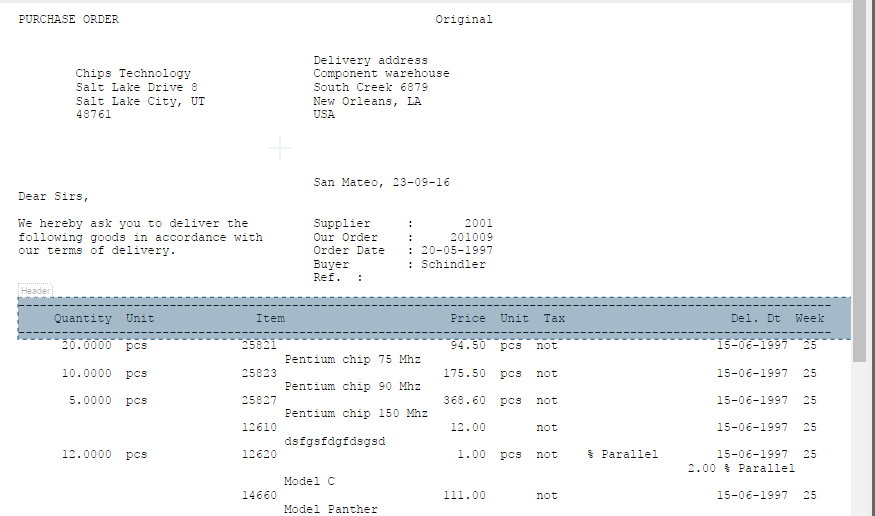
Standard Header
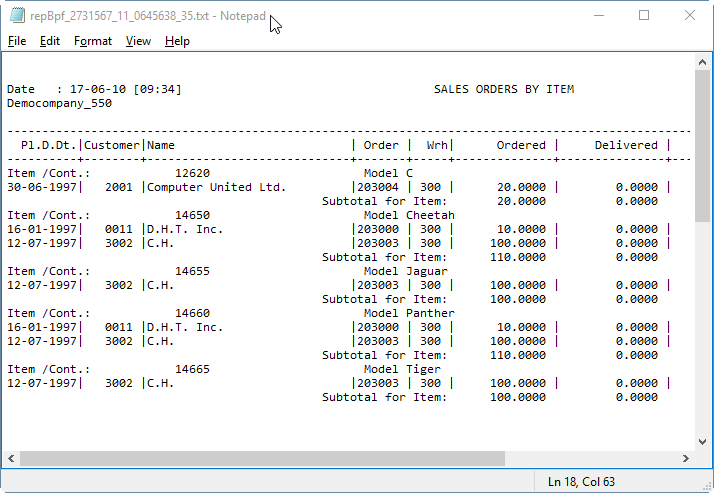
A report contains a standard header that comes always in the same position in each page of the report.
Example:
When you configure a similar report to this one, usually the main header will be auto detected.
Auto detection searches for the first dash line and marks the main header from the first dash line until the second dash line. In some cases, the first dash line is not the start of the main header. In this case, you should mark the main header manually.
No Header
Some reports have data in a table with no header. These are usually customized reports.
In order to define the header type, go to Edit -> Header and choose No Header
Header in First Page Only
If the report has a header in the first page, while other pages contain data with no header, you need to specify this option.
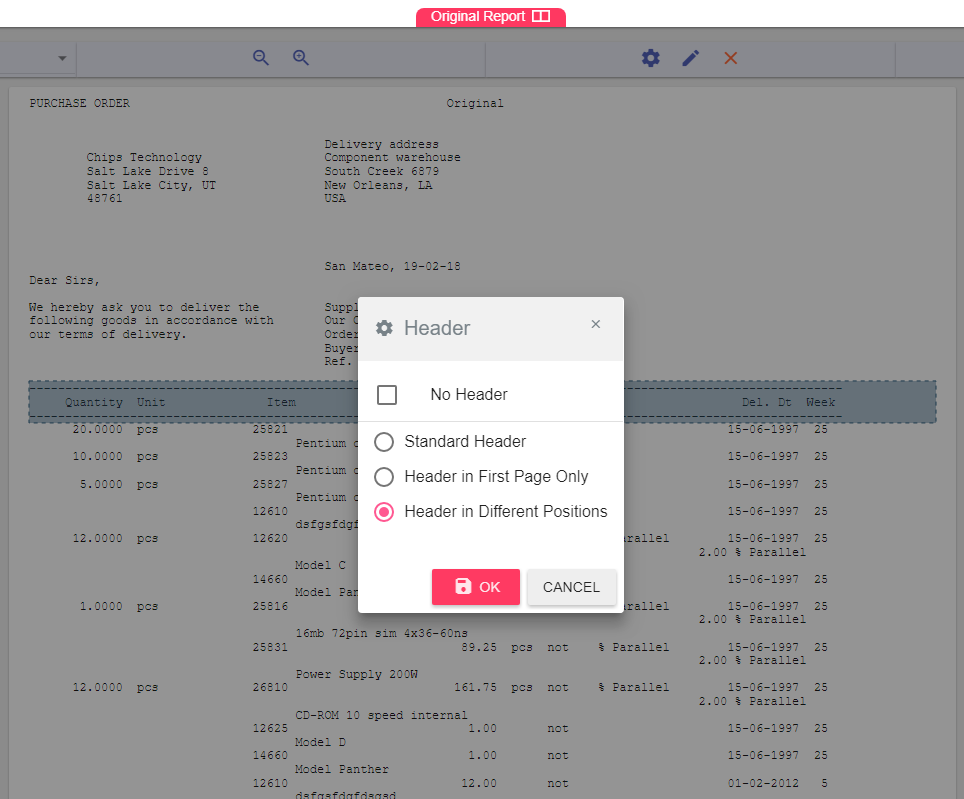
Header in Different Positions
Sometimes, the header does not appear in the same location in every page, as in the following example:
In the first page:

In the second page:

In this case you need to specify this option so that headers and data are detected correctly.
Usage
Assign Main Header
If the main header is not detected automatically, or if it was mistakenly detected, you
can manually specify the main header.
To set the main header:
-
In the Original Input view of the PDF Designer, mark the header text you want to choose.
-
You’ll get a menu to choose the block type, you need to choose Main Header.

-
In case you already had a main header marked before choosing a new one, then you’ll get the following message
Changing the main header will cause all settings in the Designed Output view to be cleared since this action may change the blocks’ structure. Click yes to allow clearing these settings and setting the new main header.
-
To set the main header type you need to select the main header block and click on settings icon.
Remove Main Header
You can remove the main header that was already set by selecting the main header block, then click on the delete icon.

Detail
This is the part that comes after the main header until the end of the page.
Patterns
Introduction
Patterns are powerful tools to design your report with. It gives you the ability to select almost any part of your text so that you can design it. First you would have to identify the pattern of the line that contains your text and then select what you want to use from this line. The identification process is done by marking parts of this text and setting some properties that will help the designer to find the line. After that, the user should select the blocks he wants to design and they will be ready for use.
Each pattern should have a name and the user should also set in which area and page this pattern should work. The same pattern will work on all the lines that match this pattern.
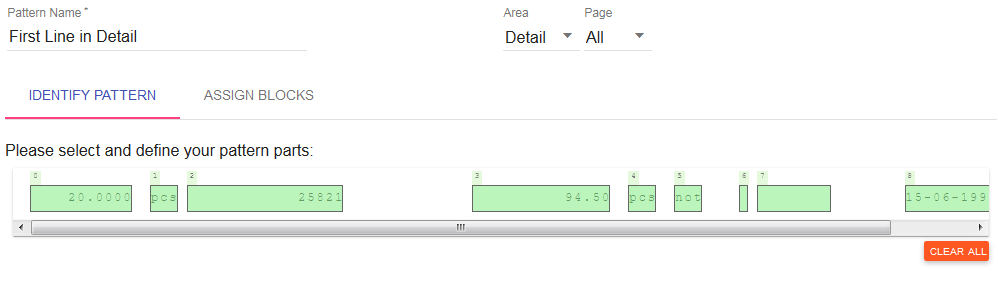
You can add a pattern by selecting a text on a line and click on “Define Pattern”:
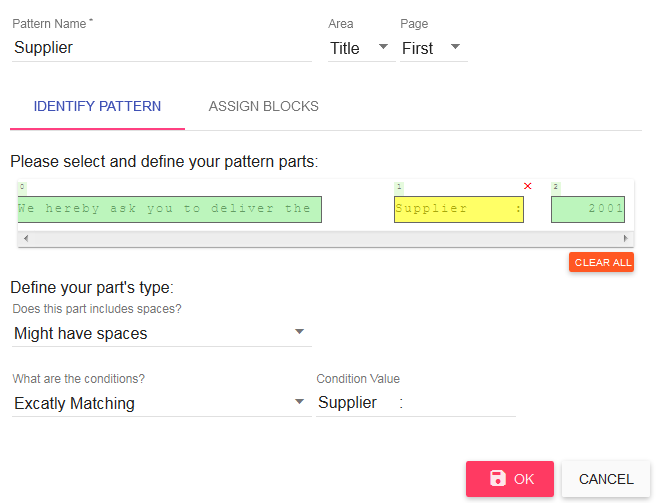
Identify Pattern
The first step in working with the patterns is to identify the places in the line that might contain text and mark them. The designer will try to guess those parts but the user will need to adjust the guess by enlarging the selected part, for example, or mark other places that can contain text in the other runs.
In case you need better identify the pattern you can set specific settings for each part by selecting it and choose if this part type of spaces and other conditions like does it always begins (ends contains) with the same letters, or does it exactly match a phrase. You can also use regular expressions to even set if this part is a date, number and so on. Here is an example:
![]()
This pattern is identified only in the title area and first page where the text can appear only in the marked parts. An extra condition was added that the second part (yellow) must exactly match the phrase: “Supplier :”.
So whenever the designer sees this pattern (the marked places and the specific phrase) it can identify and now it is time to tell the designer what to do with it by first assigning the blocks.
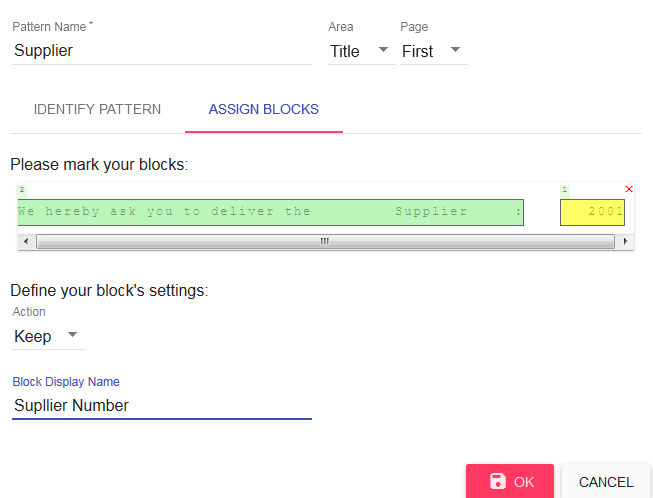
Assign Blocks
After identifying the line we need to assign the blocks that we want to keep and those that we want to delete from this line by simply marking them in the “assign block” tab and setting the action. For example:
We would like to keep the supplier number and delete the rest of this line. In the “Design Preview” you should be able to see the supplier number there and set the design that you wish for it.
Show All Pattern Occurrences
After you have defined your patterns, you can select any of the already defined patterns and click on the eye button  next to it to get all the pattern’s occurrences marked in the designer. This way if any of the occurrences of the pattern is wrong and does not belong to it, or if the desired occurrences are NOT marked, then you can fix the pattern settings to match the required result.
Floating/Fixed blocks
Introduction
What is a Floating Header Block?
Some reports may contain sub-headers, sub-titles or sub-totals. All of these entities are defined as “floating header blocks” and need to have special treatment.
A floating block is an area of two different blocks. Both of them are inside a rectangle and they can appear anywhere in the report.
Each floating block has two parts: label and value. The label is the string key that is needed in order to recognize the floating block. The value is the string that will be associated with the floating label.
What is a Fixed Block?
Fixed block is a certain text area in the report which can be defined as a single or multi-line inside a rectangle. In any report, it always begins and ends in the same (Line, column) coordinate.
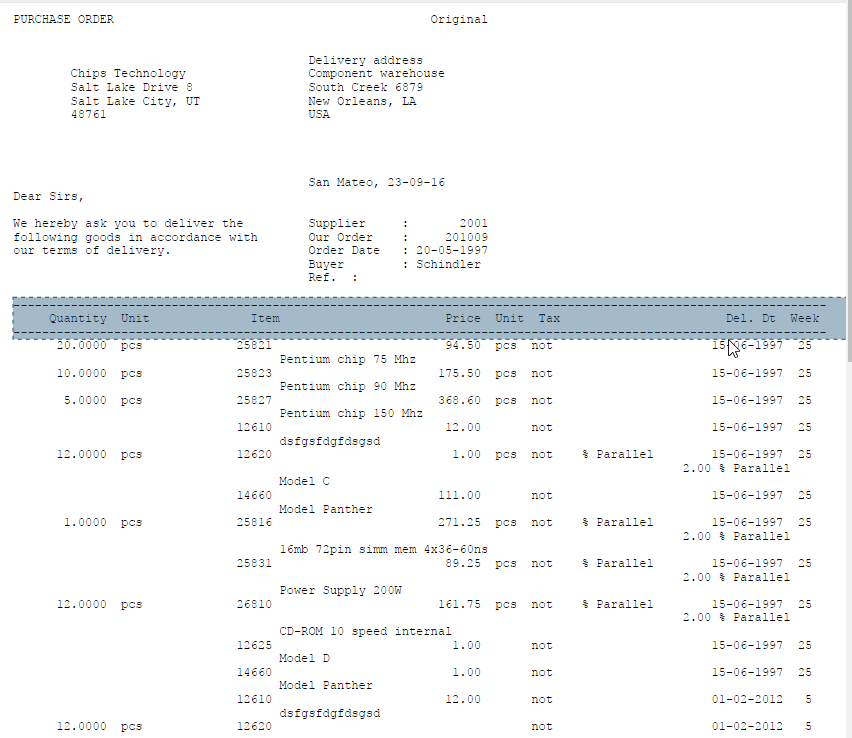
Example:
Label
Floating header blocks have two parts: label and value. The label is the string key that will be needed in order to recognize the floating header block. In the above example, the floating label is “Item :”.
Note that a label can’t be multiline.
Value
The value of the floating header block is the changing field related to the floating header block’s label. The first value in the example above is “P1030” but different values may appear towards the rest of the report.
Note that the value may be one line or multiline.
Relation between Label and Value
The label and value of a certain floating block may appear on the same line. This is the most common use of floating header blocks.
In more complex scenarios, the label and the value are not next to each other. The rule we need to keep is to have fixed distance between them, in rows and columns.

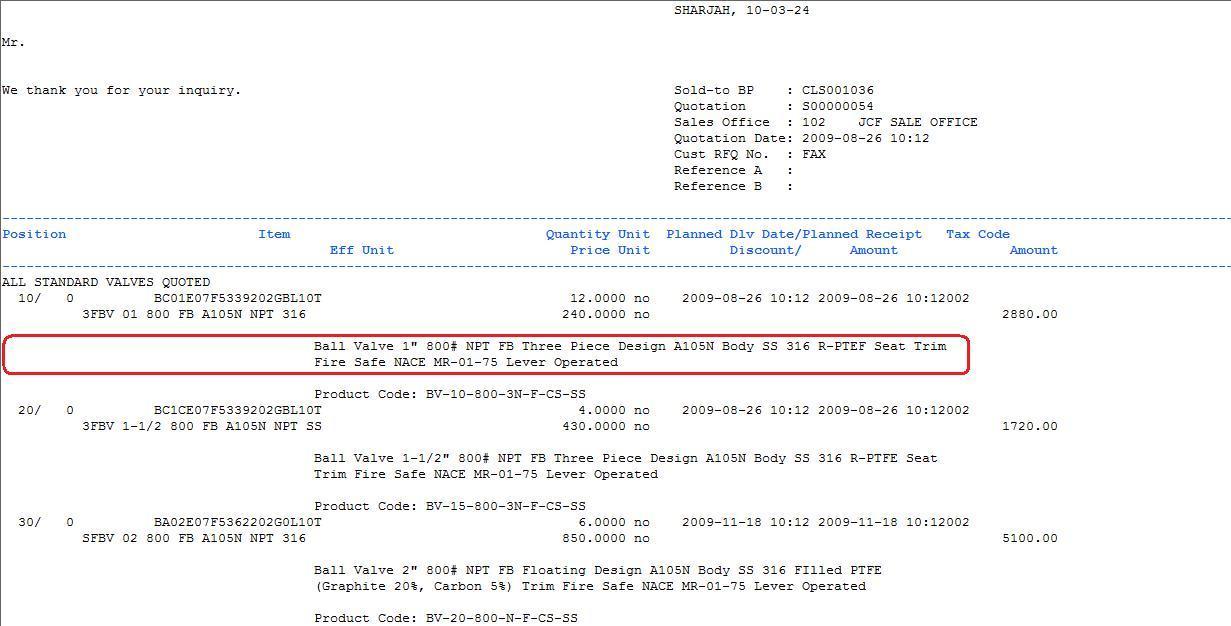
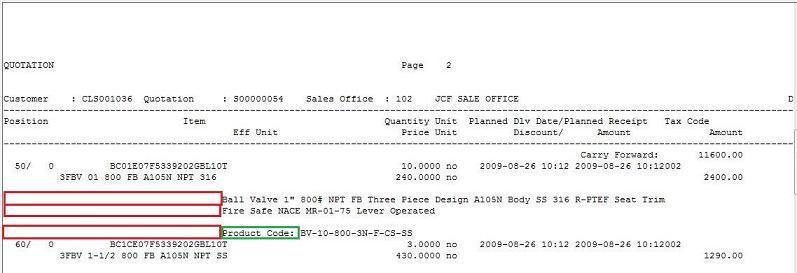
In this report we want the label “Delivery address” (Marked in red) to have the value in a different line (Marked in blue).
Floating Header Blocks Types
Regular Label
This floating block has a label and value where the label’s appearance in the same x coordinate once is the key condition of this type
Label must be of one line while the value may be multi-line.
![]()
These are the steps to mark the floating header label and value:
-
Set Floating Header Label: Mark “Item :” and you’ll get the following menu
-
Select “Floating Header (Label)
-
Then you get the following message

-
Mark the Floating Header Value (Marked in blue in the previous screenshot)
Repeated Label
A different type of floating header block is the one where the label is repeated in every line, next to the value, and we have a variable number of lines for this floating block.
Example:
![D:\Jamal\B2Win\Document\Report Customizer\repeated labels.jpg][image29]
In this report, we have the text that appears for every item. The number of lines for each text is variable. We define here a floating block with repeated label of spaces.
-
Mark first spaces that appears before the text and select Floating Header
-
Then mark the first line of the value as asked.
-
Click on the settings icon when current floating block is selected
-
Go to Advanced tab
-
Check the Repeated Label check box.
-
Then Choose the number of maximum lines for the block.
After repeated label has been set, you can set all other floating header options for this block.
Anti-Label
Sometimes, it is hard to define a floating block and it is easier to define an anti-label, which means that when a label does not equal a specific term, recognize this as a floating block.
The following is an example:
After you define the space (Marked in red) as the anti label, go to block settings, the second tab, Advance tab and fill the Anti Label field with “.”
This means that all lines that do not contain “.” in the label position should be recognized with the value marked in blue which is the item description.
Block Action
After you have defined the floating header/fixed blocks properly, you can decide the action you want to perform on each block.
Note that the first two actions are applicable for the floating header block and the fixed block. And the rest of the actions listed are applicable only for the floating header block.
Supported actions are:
Keep
Use this option when you wish to keep the floating header/fixed block (Label and value) in the same place it appears in the result.
Delete
When this option is specified the floating header/fixed block will be removed from all report pages.
Delete Value
This option keeps the label wherever it appears in the original report, and deletes the specified value in all its instances.
Delete Label
This option keeps the value wherever it appears in the original report, and deletes the specified label in all its instances.
Additional Options
Priority
We may have multiple floating header blocks in one report. To avoid conflict and one floating header block “winning” over the other, we can assign a Priority for a floating header block in a report, that causes the customizer to search for the highest priority first – before it handles the lowest priority floating header blocks.
In this example, Red rectangle mark the first label, Green rectangle is the second label
We see that in the second (Green) rectangle, also the first (Red) label answers the same pattern, but our desire is that the green label to be parsed and processed first in these lines.
![D:\Jamal\B2Win\Help\resources\SHARJAH - Priority.JPG][image32]
How to do this in the PDF Designer?
-
Mark the first floating header label (marked in red) and value and set it’s display name to “Desc.”.
-
Mark the second floating header label (marked in green) and value and set it’s display name to “Code”.
-
To activate floating header block priority, go to: Edit -> Global Settings, go to the first tab and check the Enable Floating Label Priority.
-
The priority tab will be enabled right then, go to it.
-
And change the priority order by dragging Code to be the first one.
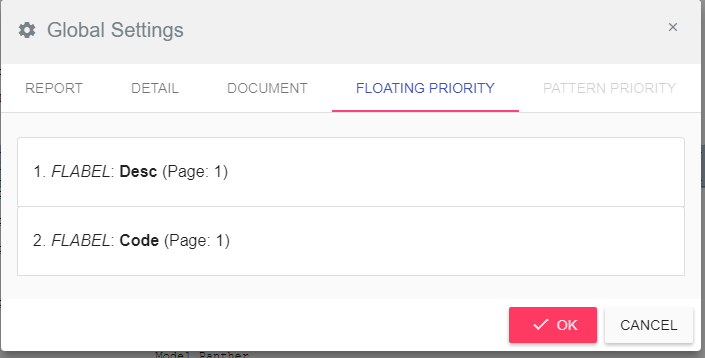
-
Click okay.
Note: if you Enable Floating Label Priority option it will be enabled for all floating blocks set inside this report.
The same thing goes for the pattern. You might be forced to enable the priority feature to help the designer to know which pattern have a higher priority in order to apply it first.
Area
Floating blocks may appear in every part of the report, but we may wish to limit it to a certain part only, in order to avoid conflict.
When you click on the block settings icon, it opens the settings window where you can select the part where this floating/fixed block should appear in the report.
All – in all report parts
Title – only in title (see chapter 2.2 for Title definition)
Detail – only in the detail area (see 2.4 for Detail definition)
If we set a floating header block to be in Detail, and there is a certain match for it inside the Title area, the PDF Designer won’t parse it when it finds it in the Title area.
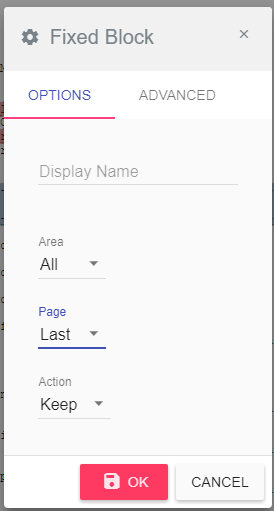
Page
Fixed blocks may appear in every part of the report, but we may wish to limit it to a certain page only, in order to handle different report page layouts.
Select a fixed block under and click on the settings icon, there you can select the page where this fixed block should appear in the report.
All – in all the report
First – only in the first page
Middle – only in middle pages
Last – only in the last page

Note that this option applies on fixed blocks only.
Multi-Line Detail
Detail lines contain lots of data, generally one line describes one entity/item. But sometimes more than one line can describe one entity, in this case we call it Multi-Line Detail. (Which means a group of lines are related and describe the same entity)
Each rectangle contains the data for one item and should be
transformed into one line
In order to be able to have a different design for the first line in these groups than the second line in the Designed Output view, for example different colors, you will have to set it as Multi-Line Detail.
In the next steps, we will describe the way to set Multi-Line Detail to achieve this goal. We can divide the Multi-Line Detail into two groups as the following
Fixed number of Multi-Line
This is the case where the number of lines in each group of lines in Multi-Line is fixed.
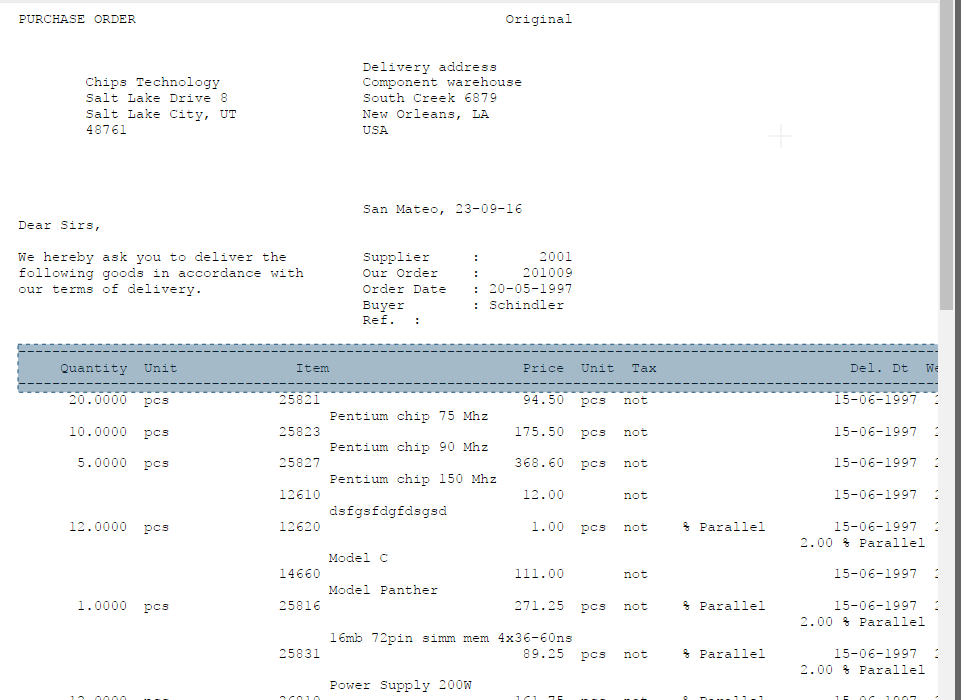
Example:
Each group of Multi-Line has two lines
How to set up this report?
-
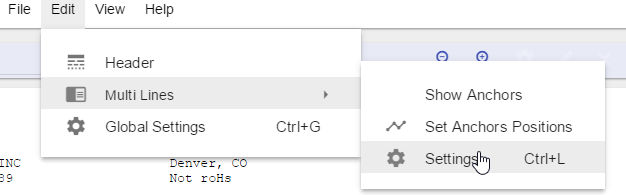
Go to Edit -> Multi Lines -> Settings
-
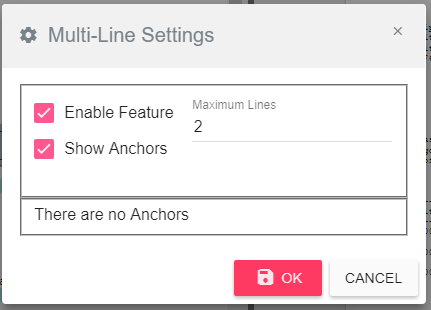
Check the Enable Feature option.
-
And set the Maximum Lines to 2.
In the Designed Output view you can now select the first line block from the first group and you’ll notice that all related blocks are also selected. And now you can move or change the color and all first lines of all groups will be affected.
Variable number of Multi-Line
This is the case when the detail is Multi-Line but the number of lines in each group is variable. And in order to find each Multi-Line group we need to be able to find at least the first line in the group. For that we have the anchor which is a character or a group of characters that have to appear in a certain position of the line in order to set this line as the first one in the Multi-Line group.
So, in general the user can set a different anchor for each line in the Multi-Line group.
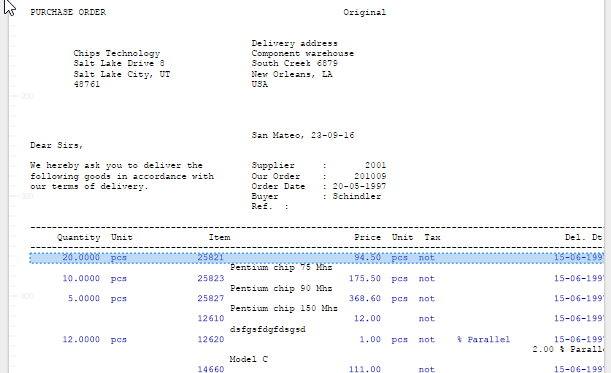
Example:
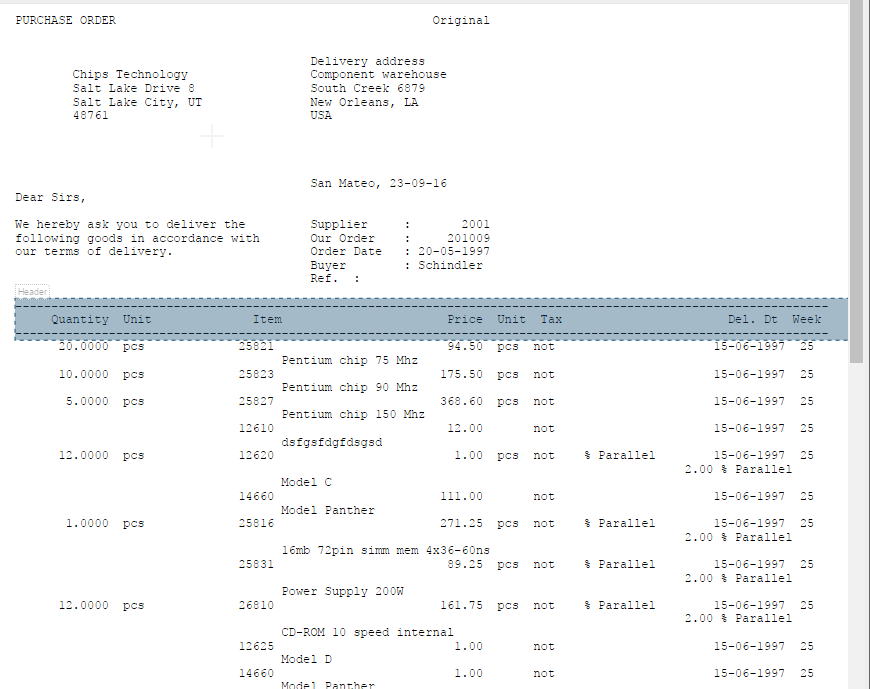
You can see that in group A the second line is actually the third one in group B, and so we need to set an anchor for the first line and another anchor for the second line in this example in order for the PDF Designer to recognize the related line blocks together so that in the Designed Output view you can give each it’s different design.
We will show you the steps on how to set up the anchors to get a good result as a table. Follow these steps:
-
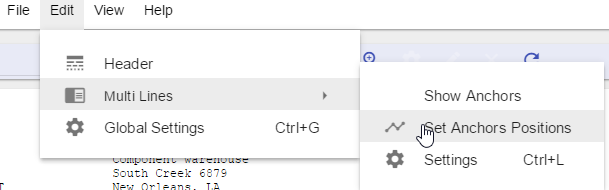
Got to Edit -> Multi-Lines -> Set Anchors Positions
-
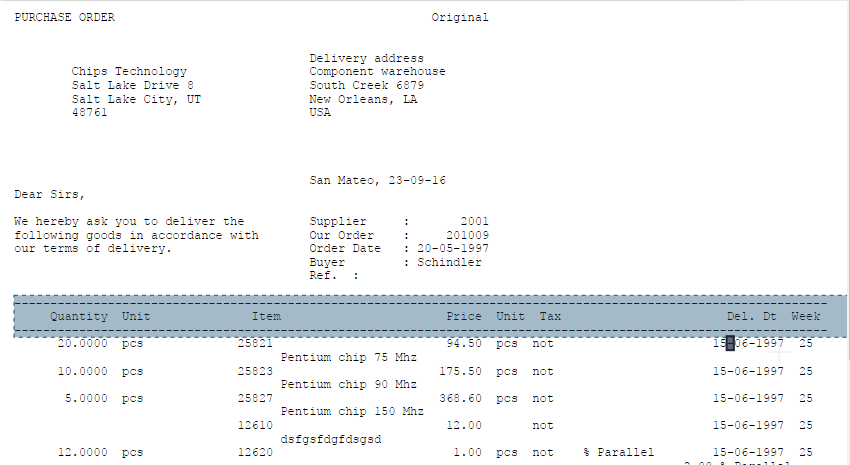
Now you need to choose and mark the anchor in the right position. As in the message

For the first anchor you can mark the “-“ (dash) that appears in the date (last column)
-
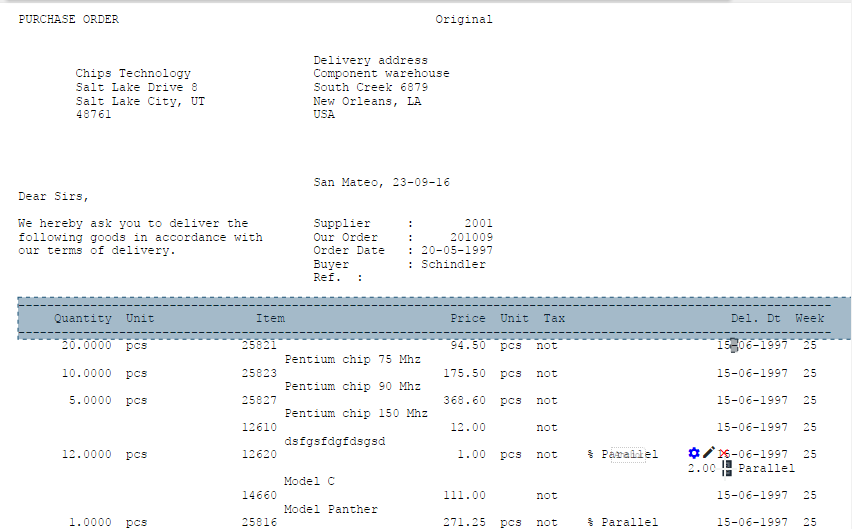
You should now mark the second line anchor.

For the second anchor you can mark the “%” sign in the line
-
No need to mark a third anchor since it’s obvious in this example that the third line which doesn’t march the first or the second anchor should be the third line in the Multi-Line group

So, you need to click on FINISH in this above message to get the result in the Tabular Output updated.
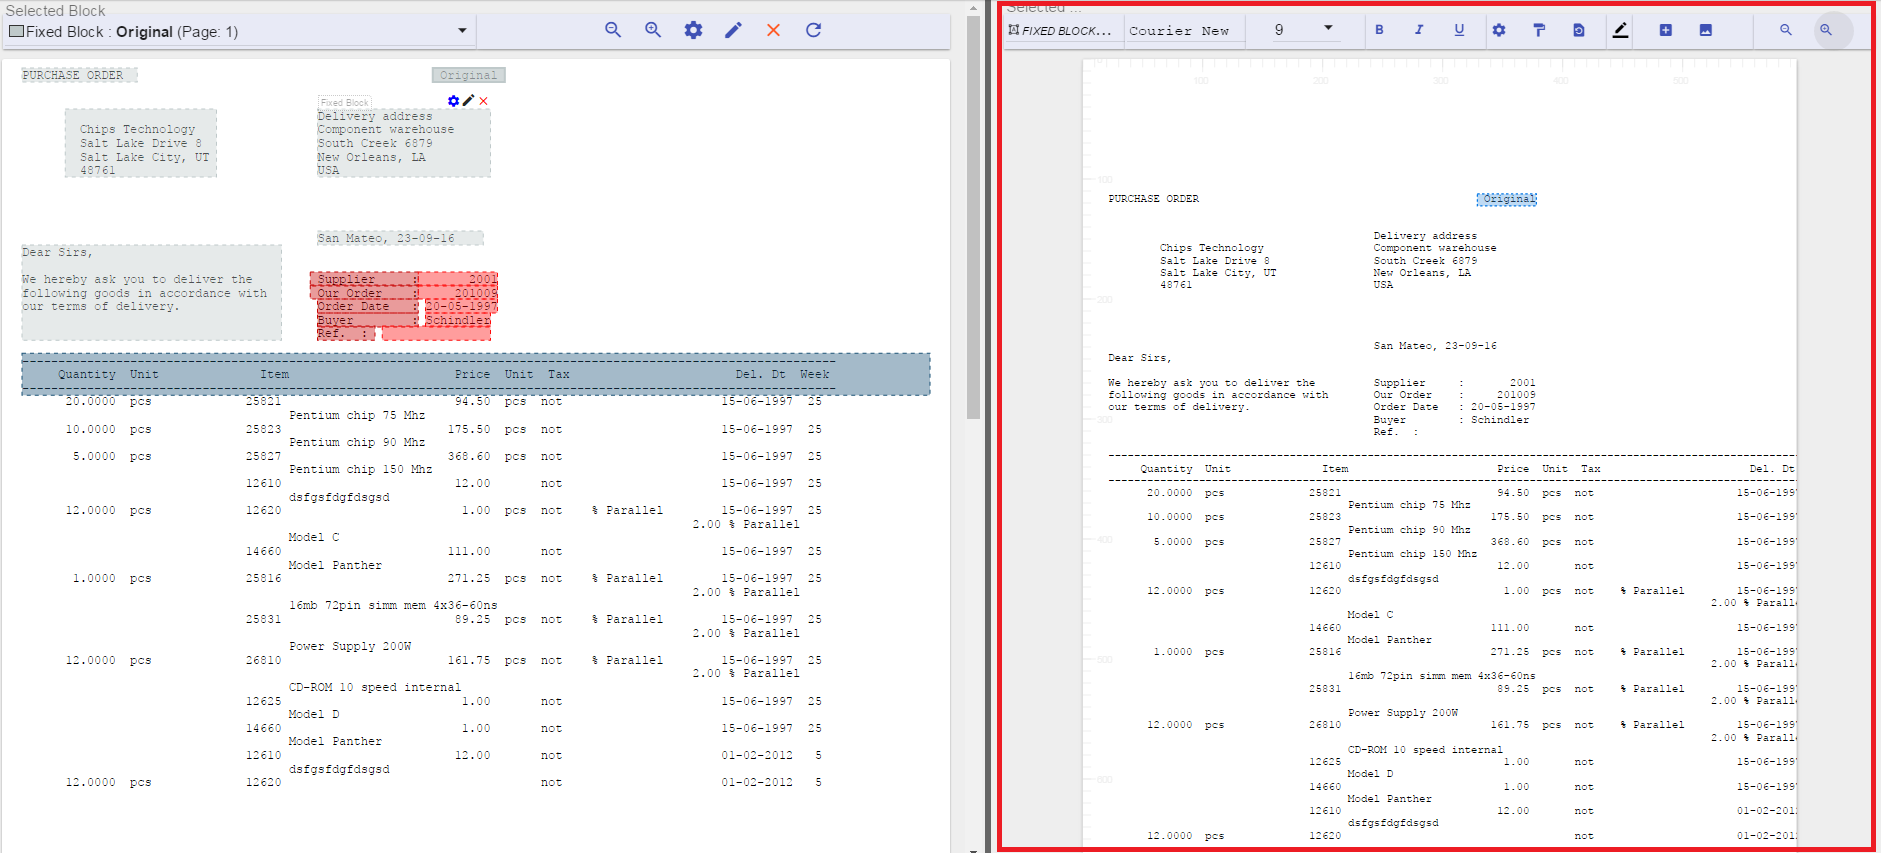
-
And now you can go to the Designed Output view and select the first line in the first group in detail and change its color for example. As you can see in the screenshot all first line blocks for all Multi-Line groups will have this color. This way you can design the detail as you wish.
Settings
Enable Feature
Check this option to enable Multi-Line feature for this report. After that you need to set at least one the following, the Maximum Lines or the Anchors.
Maximum Lines
This is the maximum number of lines in the Multi-Line group. When this number is not set then the first anchor must be set so that all lines between each two first anchors are considered one group.
You can find this option in Edit -> Multi-Lines -> Settings

Anchors
You can find a list of all anchors for maintenance in Edit -> Multi-Line -> Settings
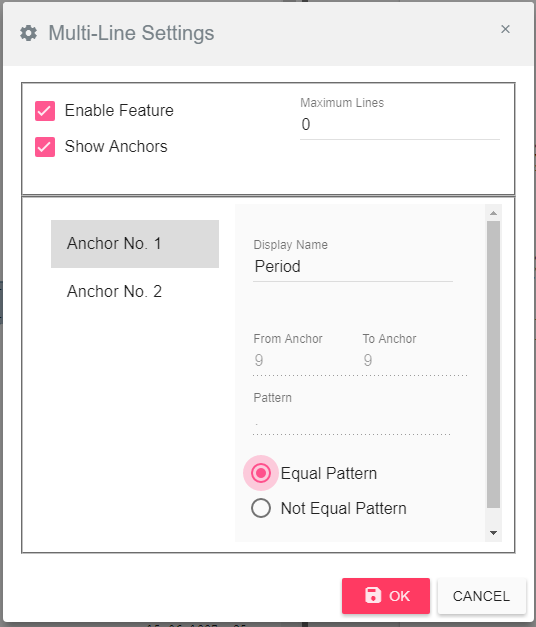
On the left side, you can find the anchors list, choosing one of them allows you to view/edit all its data on the right side of the settings window.
-
Display Name – This is the name that will appear for this anchor in the blocks list.
-
From/To Anchor – The position and length of the anchor in the line
-
Pattern – The pattern that should be compared to find the anchor, it’s by default the selected text from the report, but you change it here.
-
Equal Pattern – when selected it means that when the Excel Designer finds the pattern in the from/to position in the detail line then this is a match.
-
Not Equal Pattern – when selected it means that when the customizer finds a text in the from/to position in the detail line that is not equal to the pattern then this is a match.
Show Anchors
This option to show/hide the anchor blocks in the Original Output view
Designer
One of the great features in the Designer is the ability to take output reports from Baan and turn them to a designed PDF document. The following chapter will discuss the different graphic options and the methods to fine tune graphics in the document and block levels to best fit your needs.
One of the popular uses when designing a PDF document is a company logo and some footer information that may include the address. Other common use is to include a background image to the document (as a document template).
Some documents include graphic information that come from the system; such as bold and italic and different font character size. The Designer allows you to produce documents that include these graphics and define both global and block settings for the document such as changing font style, size, color, line spacing and text scaling. It also allows you to add new text and draw rectangles.
After defining the blocks and header type, as well as action related to each area & page in the original view. The next thing to do is to focus on the designed output view:
At any time you wish you can choose to save or clear the design that you have made by clicking on the file menu:

In order to see the output as a PDF file you can click on the Preview button:

Backgrounds
Backgrounds can be used from the ones that are already defined in B2Win Suite. Just select the background you want in the B2Win transform:
Or you can add a new background to the system by clicking on the image icon ![]() in the toolbar and the following dialog will open which has a similar settings to the one in B2Win, where you can upload new images or choose an image from the ones that are already in the system.
in the toolbar and the following dialog will open which has a similar settings to the one in B2Win, where you can upload new images or choose an image from the ones that are already in the system.
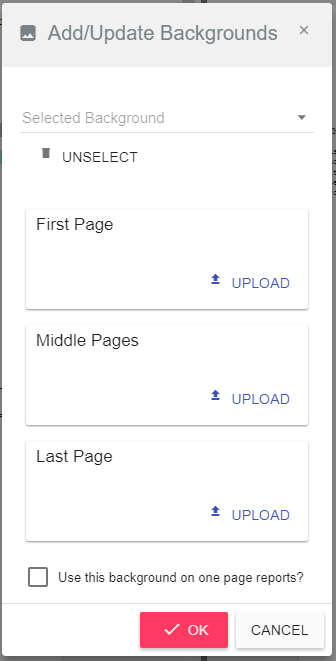
After that the image should be in the Designer output view and then you can resize and reposition it.
When you add a new background, you will have to save it as a new entry in the B2Win Suite.
If you are updating the settings (position or size) of an existing one, you will have to save the new settings in the B2Win Suite too. When you save the design, you will get a dialog asking you whether you want to create a new copy for this background in the B2Win Suite or update (overwrite) the current one you have used.
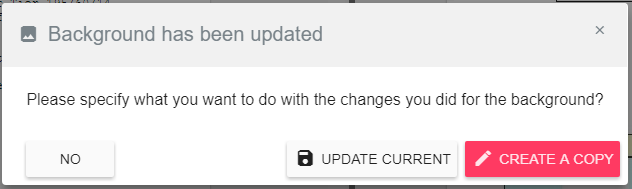
Those new backgrounds will be treated as any background in the B2Win Suite and can be used from all the other B2Win Suite products.
Document Settings
You can edit the document settings from the edit menu -> Global Settings then in the document settings tab. There you can change the margins, paper type and the orientation. Also, you can add new paper types that will automatically be added to your B2Win Suite.

Selecting and Moving Blocks
After you have applied your background image or even if you don’t have one, you can select any block and move it to where ever you want in the document. Some blocks are related to each other, depending on your setup and some they might move together. For example if you have a label block that appears twice in the detail area that contains “Supplier Name:” where ever you move the first one, the second will move relatively with it. Also the formats that you apply for one, the others get it automatically.
If two blocks are above each other, you can click it again and on each click the designer will call the last block to the front and rotate through all the blocks in that area until you reach the one you want so you can move or format it. Or you can select it from the first field in the toolbar

Formatting Options
The Designer`s toolbar is similar to other popular editing software. First you can see the description of the block that is selected, and then you can see font name and size after that comes the bold, italic, underline options and the coloring tool which can color the selected block text.
Using the roller brush ![]() you can copy the selected format and apply it to another block and there is reset option
you can copy the selected format and apply it to another block and there is reset option ![]() that will clear all the formatting from the block.
that will clear all the formatting from the block.
We will address the settings icon ![]() later on.
later on.
Adding Extra Object – Text
The designer allows you to add additional text to your report from any free text, variable from report or pre-defined block simply by clicking the plus button ![]() in the toolbar will open the following dialog:
in the toolbar will open the following dialog:
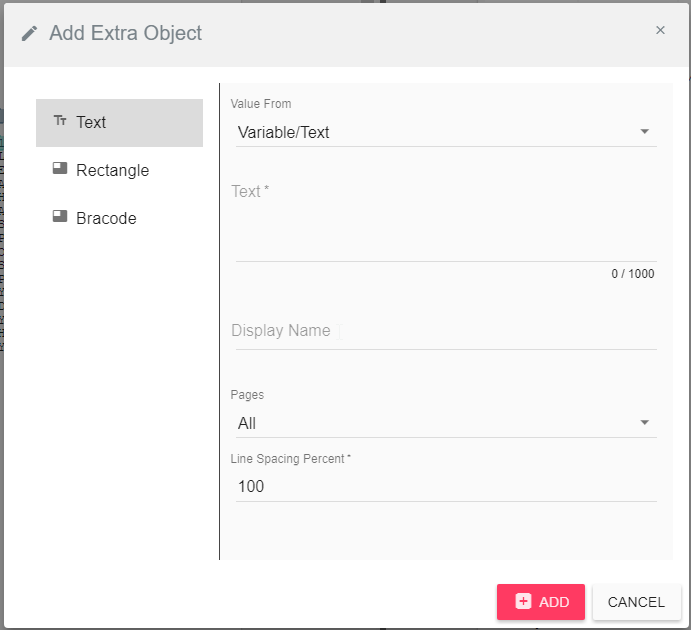
In case you need to add some free text to the output then choose the “value from” to be “Variable/Text” and write your own text in the “Text” field.
You can also add a Custom Variable in the “Text” field, for example if you want to add the user’s name, you add this text “<USER>” and it will be replaced by the user’s name during the conversion. There are several variable types that can be used here, custom, system or report database variables. You can find a description of all variables in the Implementation Enterprise manual. This feature is only available in the Enterprise version.
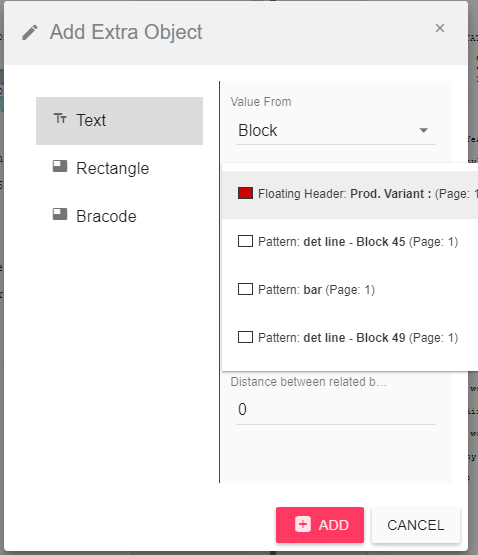
Another option is to copy the value of one of the blocks that you defined earlier. For this option you need to choose the “value from” to be “Block”. Then you get to choose the block from all the blocks list. When you click on “ADD” you’ll see a copy of the block you chose, positioned relatively to the original one. You can change its position and formatting as you wish.
You can set the text to appear in all the pages or only in the first, middle or last. The line spacing is the empty spaces between the text lines that you have added. After you have finished click on add and a new block will be added to the designed output view and you can reposition and format it.
Adding Extra Object - Rectangle
The designer allows you to add rectangles to your report simply by clicking the plus button ![]() in the toolbar will open the following dialog (click on “Rectangle”):
in the toolbar will open the following dialog (click on “Rectangle”):
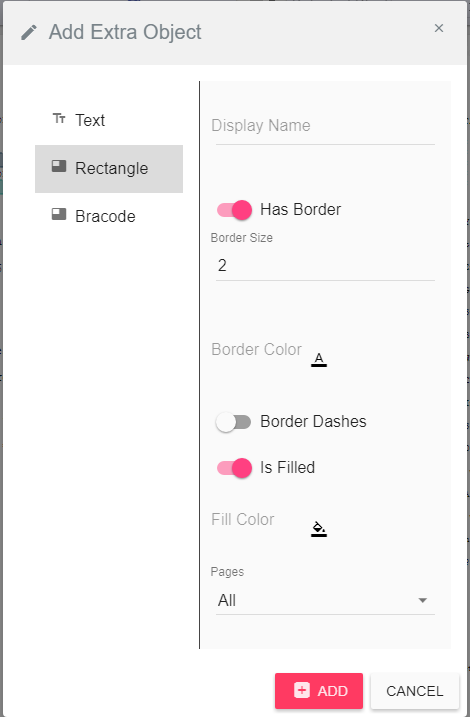
You can give a name for this rectangle (in the “Display Name” field) then you should choose whether you would like to have a border for the rectangle and choose the size of it (width of the border line). Then you can choose the color of the border and if you like it to be dashes or a straight line. You can also choose a different color for the fill color which will color the inside of the rectangle.
As in other places you can set the text to appear in all the pages or only in the first, middle or last.
Adding Extra Object – Barcode
You can add barcodes to your design by adding an extra object of type barcode. You can choose whether to get the barcode value from “Variable/Text” where you can insert the variable name or the free text you need.
Or you can define the barcode based on a block that was defined in the designer. You can choose the block from the list. And then the barcode position will be relative to the original block and in case the original block has more than one appearance in the report than you’ll have a barcode for each.
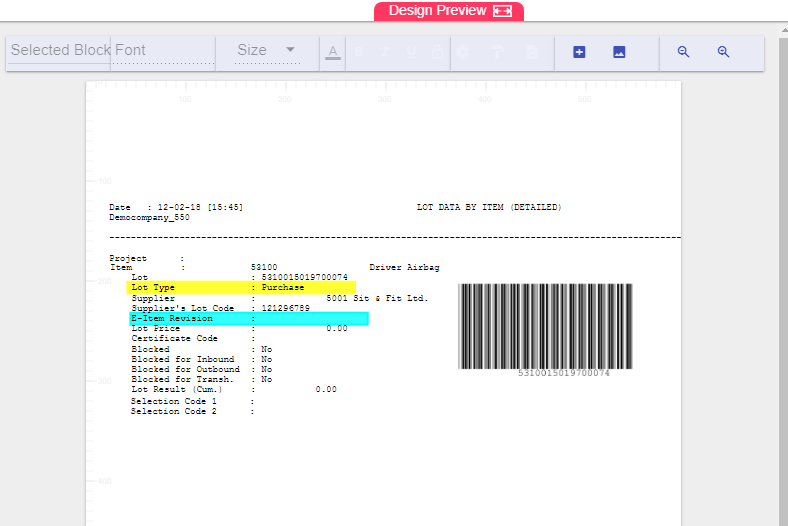
Check the following example where the barcode is based on a floating header value.
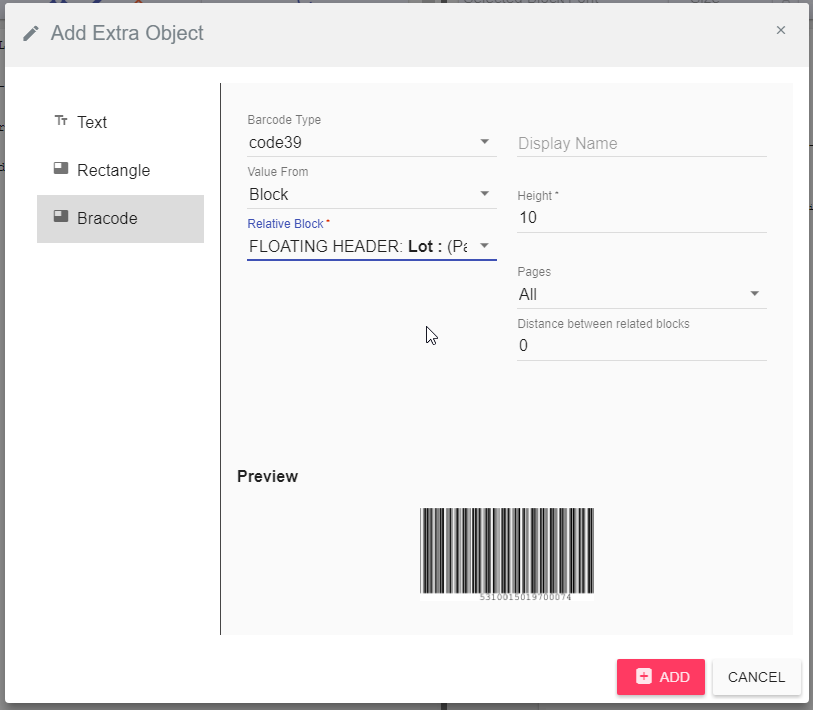
This is the result in the designer,
Zooming In/Out
You can use the zooming icons ![]() to zoom in and out to get a view that suites you.
to zoom in and out to get a view that suites you.
Block Lock
Whenever you finish working on any of the blocks positioning and formatting you can lock the block by clicking on ![]() so that you won’t update it by mistake.
so that you won’t update it by mistake.
You can also lock the background when it’s set in the required position so that you can work on other blocks safely without having unwanted changes for the position or the scale.
Block Settings

You can set the “line spacing” between the lines of the selected block so the bigger the number the larger the spaces between the lines of the box. Here is an example of increasing the line-spacing to 200%:

Sometimes different blocks will be related together. For example if the floating label appears more than once in the same page (or if it is a multi-line report), then you might need to increase the distance between those blocks.

If you increase the distance between related block, it will look like this:

Saving
Saving can be done in two modes in the system, it’s according to what the B2Win Suite is implemented to work with Multiple Designs or One Design per report, admin can change this setting from Settings page in B2Win Suite (More in Implementation Manual)
By default, the system is configured without the multi-design, that means you can only have one report design for each report.
Report level
For report level saving, when you click on save the design will be saved to the report itself, then any user that will open the wizard for this report will have the same design that was saved.
Multi-Design
When the system is working in multiple Customization/Designs mode, if you click on save for the first time a dialog will appear like this:

If you click on save the second time it will remember the last action you did, and save the changes to the last chosen customization.
If you want to see the dialog again, you can click on Menu -> File -> Save as and choose the new action you want.
In the saving dialog, you have 2 actions:
- Update Existing Design - You need to select from the below list what customization you want to override and save your changes in.
- Update Report Default - Updates the report main customization, that will cause the default customization to be used when you convert a report.
- Create new Design - Create a new customization you need to fill the new customization name.
Menu Help Tab
Manual
Open the manual PDF inside the browser where you can view all the pages of the manual.
Hot Keys
For plenty of actions inside the Wizard you have hot keys to perform these actions with the keyboard, clicking on Hotkeys from inside the menu -> Help will open a frame where you can view all the hot keys.
About
Open a page where you can see all the current configuration and settings that have been used in the report/input you have chosen from the ERP.
You can also download a debug archive to send to B2Win Suite support when troubleshooting an issue.